i get this tutorial on website http://randomnerdtutorials.com/esp8266-remote-controlled-sockets/ , i copy from this site for my own purpose documentation, please refer to that website for detail
Parts List
Here’s the hardware that you need to complete this project:
RC Switch Library Download
Here’s the Arduino library you need for this project:
- Download the RC Switch library
- Unzip the RC Switch library
- Remove the “-” from the folder name, otherwise your Arduino IDE won’t recognize your library
- Install the RC Switch library in your Arduino IDE
- Restart your Arduino IDE
The RC Switch library is great and it works with almost all remote controlled sockets in the market.
Receiver Circuit
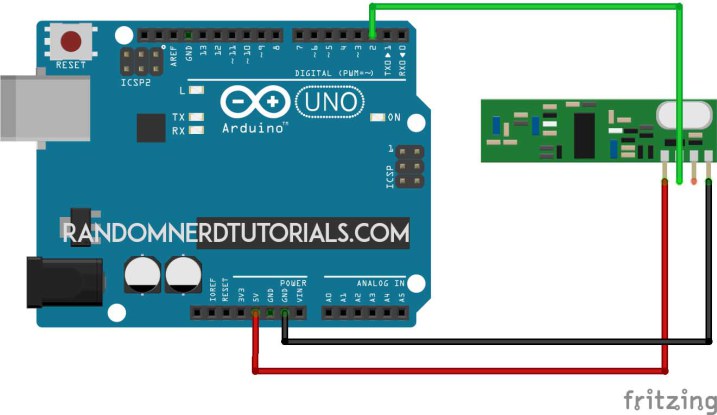
Follow the circuit above for your receiver. Then upload the code below or you can go to File > Examples > RC Switch > ReceiveDemo_Advanced.
/*********
Rui Santos
Complete project details at http://randomnerdtutorials.com
*********/
#include <RCSwitch.h>
RCSwitch mySwitch = RCSwitch();
void setup() {
Serial.begin(9600);
mySwitch.enableReceive(0); // Receiver on inerrupt 0 => that is pin #2
}
void loop() {
if (mySwitch.available()) {
output(mySwitch.getReceivedValue(), mySwitch.getReceivedBitlength(), mySwitch.getReceivedDelay(), mySwitch.getReceivedRawdata(),mySwitch.getReceivedProtocol());
mySwitch.resetAvailable();
}
}
Save the TriState Values
Open your Arduino serial monitor at a baud rate of 9600 and start pressing the buttons of your remote. Save the TriState values (highlighted in red) of each key in a notepad.

Schematics (3.3V FTDI Programmer)
The schematics to upload code to your ESP8266 are very straight forward. You only need to establish a serial communication between your FTDI programmer and your ESP8266 to upload some code.

Uploading your ESP8266 code
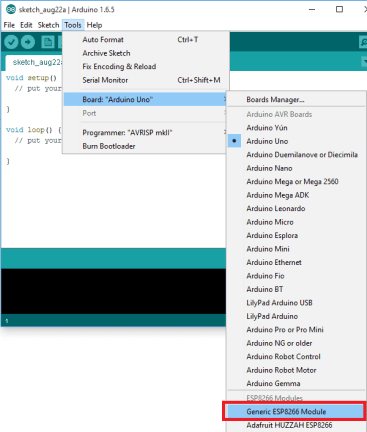
Having the ESP8266 add-on for the Arduino IDE installed (How to Install the ESP8266 Board in Arduino IDE). Go to Tools and select “Generic ESP8266 Module”.

Copy the sketch below to your Arduino IDE. Replace the SSID and password with your own credentials. You also need to change the TriState values. After modifying my sketch upload it to your ESP8266.
/*********
Rui Santos
Complete project details at http://randomnerdtutorials.com
*********/
#include <ESP8266WiFi.h>
#include <WiFiClient.h>
#include <ESP8266WebServer.h>
#include <ESP8266mDNS.h>
#include <RCSwitch.h>
RCSwitch mySwitch = RCSwitch();
MDNSResponder mdns;
// Replace with your network credentials
const char* ssid = "YOUR_SSID";
const char* password = "YOUR_PASSWORD";
ESP8266WebServer server(80);
// Replace with your remote TriState values
char* socket1TriStateOn = "0FFF0FFFFFFF";
char* socket1TriStateOff = "0FFF0FFFFFF0";
char* socket2TriStateOn = "0FFFFF0FFFFF";
char* socket2TriStateOff = "0FFFFF0FFFF0";
String webPage = "";
void setup(void){
webPage += "<h1>ESP8266 Web Server</h1><p>Socket #1 <a href=\"socket1On\"><button>ON</button></a> <a href=\"socket1Off\"><button>OFF</button></a></p>";
webPage += "<p>Socket #2 <a href=\"socket2On\"><button>ON</button></a> <a href=\"socket2Off\"><button>OFF</button></a></p>";
mySwitch.enableTransmit(2);
delay(1000);
Serial.begin(115200);
WiFi.begin(ssid, password);
Serial.println("");
// Wait for connection
while (WiFi.status() != WL_CONNECTED) {
delay(500);
Serial.print(".");
}
Serial.println("");
Serial.print("Connected to ");
Serial.println(ssid);
Serial.print("IP address: ");
Serial.println(WiFi.localIP());
if (mdns.begin("esp8266", WiFi.localIP())) {
Serial.println("MDNS responder started");
}
server.on("/", [](){
server.send(200, "text/html", webPage);
});
server.on("/socket1On", [](){
server.send(200, "text/html", webPage);
mySwitch.sendTriState(socket1TriStateOn);
delay(1000);
});
server.on("/socket1Off", [](){
server.send(200, "text/html", webPage);
mySwitch.sendTriState(socket1TriStateOff);
delay(1000);
});
server.on("/socket2On", [](){
server.send(200, "text/html", webPage);
mySwitch.sendTriState(socket2TriStateOn);
delay(1000);
});
server.on("/socket2Off", [](){
server.send(200, "text/html", webPage);
mySwitch.sendTriState(socket2TriStateOff);
delay(1000);
});
server.begin();
Serial.println("HTTP server started");
}
void loop(void){
server.handleClient();
}
ESP8266 IP Address
Open the Arduino serial monitor at a baud rate of 115200. Connect GPIO 0 of your ESP8266 to VCC and reset your board.
After a few seconds your IP address should appear. In my case it’s 192.168.1.70.

Final Circuit
This is the final circuit for your ESP8266 that hosts a web server and transmits RF signals to control your sockets.

Demonstration
For the final demonstration open any browser from a device that is connected to the same router that your ESP is. Then type the IP address and click Enter!


Now when you press the buttons in your web server you can control both sockets (watch the video at the beginning of this project for a live demo).

No comments:
Post a Comment