#define DHTPIN 2
#define RELAYPIN 4
#define DHTTYPE DHT11 // DHT 21 (AM2301)
#define next 9
#define INC 7
#define set_mode 5
/* ----- C Program for Arduino based Alarm Clock ---- */
#include <Wire.h>
#include<EEPROM.h>
#include <LiquidCrystal_I2C.h>
#include "DHT.h"
DHT dht(DHTPIN, DHTTYPE);
LiquidCrystal_I2C lcd(0x27, 16, 2);
unsigned long previousMillis = 0;
const long interval = 5000;
int HMIN,HMAX,h,t;
int add = 11;
int st=0; //var for void match
int sb=0;//var for void match
void setup()
{
cekMem();
//Serial.begin(9600);
Wire.begin();
dht.begin();
lcd.init();
lcd.backlight();
pinMode(INC, INPUT);
pinMode(next, INPUT);
pinMode(set_mode, INPUT);
pinMode(RELAYPIN, OUTPUT);
digitalWrite(next, HIGH);
digitalWrite(set_mode, HIGH);
digitalWrite(INC, HIGH);
lcd.setCursor(0,0);
lcd.print("Sensor Starting..");
delay(2000);
}
void loop()
{
//unsigned long currentMillis = millis();
h = dht.readHumidity();
t = dht.readTemperature();
if (isnan(t) || isnan(h)) {
lcd.setCursor(1,0);
lcd.print("Error");
lcd.setCursor(0,1);
lcd.print("Check Sensor cable");
}
else {
lcd.clear();
lcd.print("Now: T:");
lcd.print(t);
lcd.print(" H: ");
lcd.print(h);
lcd.setCursor(0, 1);
lcd.print("H Min/max: ");
lcd.print(HMIN);
lcd.print("/");
lcd.print(HMAX);
delay(1000);
}
if(digitalRead(set_mode)==0){
lcd.clear();
lcd.setCursor(1,0);
setHmin();
lcd.clear();
lcd.setCursor(1,0);
lcd.print("Setting Humidity");
lcd.setCursor(0,1);
lcd.print("tersimpan");
delay(2000);
}
match();
}//loop
void setHmin(){
lcd.setCursor(1,0);
lcd.clear();
lcd.print("SET H MIN");
lcd.setCursor(0,1);
lcd.print(HMIN);
int temp=1,hmin1=0,hmax1=0;
while(temp==1){
if(digitalRead(INC)==0){
HMIN++;
lcd.setCursor(0,1);
lcd.print(HMIN);
if(HMIN==99){
HMIN=65;
}//if(HMIN==99){
//while(digitalRead(INC)==0);
}//if(digitalRead(INC)==0){
delay(1000);
if(digitalRead(next)==0){
hmin1=HMIN;
EEPROM.write(add++,hmin1);
lcd.clear();
lcd.setCursor(1,0);
lcd.print("H MIN SAVED at: ");
lcd.setCursor(0,1);
lcd.print(HMIN);
delay(3000);
while(digitalRead(next)==0);
temp=2;
}//if(digitalRead(next)==0)
}//while temp==1
while(temp==2){
//setting HMAX
lcd.clear();
lcd.setCursor(1,0);
lcd.print("Set H MAX");
lcd.setCursor(0,1);
lcd.print(HMAX);
if(digitalRead(INC)==0){
HMAX++;
lcd.setCursor(0,1);
lcd.print(HMAX);
if(HMAX==99){
HMAX=65;
}//if(HMAX==99){
//while(digitalRead(next)==0);//?
}
delay(1000);
if(digitalRead(next)==0){
hmax1=HMAX;
EEPROM.write(add++, hmax1);
lcd.clear();
lcd.setCursor(1,0);
lcd.print("H MAX Saved at: ");
lcd.setCursor(0,1);
lcd.print(HMAX);
temp=0;
while(digitalRead(next)==0);
}//if(digitalRead(next)==0){
}//if(digitalRead(INC)==0){
delay(1000);
//}//while temp=2
}//setHmin()
void cekMem(){
int tem[17];
for(int i=11;i<17;i++)
{
tem[i]=EEPROM.read(i);
}
HMIN= tem[11];
HMAX =tem[12];
if(HMIN >= 100) { HMIN = 65;}
else if(HMIN <= 65) {HMIN = 60; }
if(HMAX >=100){ HMAX=65;}
else if (HMAX <= 65) {HMAX = 60; }
}
void match(){
/if (currentMillis - previousMillis >= interval) {
//}
if((HMIN >= h) && (st==0) ){
digitalWrite(RELAYPIN, HIGH);
st=1;
sb=0;
}
if((HMAX <= h) && (sb==0)){
digitalWrite(RELAYPIN, LOW);
sb=1;
st=0;
}
}//void match
Thursday, May 5, 2016
Sunday, April 3, 2016
ARDUINO TWO PIR WITH MILIS
int calibrationTime = 5;
//the time when the sensor outputs a low impulse
long unsigned int lowIn;
//the amount of milliseconds the sensor has to be low
//before we assume all motion has stopped
long unsigned int pause = 5000;
boolean lockLow = true;
boolean takeLowTime;
int pirPin = 3; //the digital pin connected to the PIR sensor's output
int pirPin2 = 4; //the digital pin connected to the PIR sensor's output
int ledPin = 13;
/////////////////////////////
//SETUP
void setup(){
Serial.begin(9600);
pinMode(pirPin, INPUT);
pinMode(pirPin2, INPUT);
pinMode(ledPin, OUTPUT);
digitalWrite(pirPin, LOW);
//give the sensor some time to calibrate
Serial.print("calibrating sensor ");
for(int i = 0; i < calibrationTime; i++){
Serial.print(".");
delay(1000);
}
Serial.println(" done");
Serial.println("SENSOR ACTIVE");
delay(50);
}
////////////////////////////
//LOOP
void loop(){
if((digitalRead(pirPin) ||digitalRead(pirPin2)) == HIGH){
digitalWrite(ledPin, HIGH); //the led visualizes the sensors output pin state
if(lockLow){
//makes sure we wait for a transition to LOW before any further output is made:
lockLow = false;
Serial.println("---");
Serial.print("motion detected at ");
Serial.print(millis()/1000);
Serial.println(" sec");
delay(50);
}
takeLowTime = true;
}
if((digitalRead(pirPin) ||digitalRead(pirPin2)) == LOW){
digitalWrite(ledPin, LOW); //the led visualizes the sensors output pin state
if(takeLowTime){
lowIn = millis(); //save the time of the transition from high to LOW
takeLowTime = false; //make sure this is only done at the start of a LOW phase
}
//if the sensor is low for more than the given pause,
//we assume that no more motion is going to happen
if(!lockLow && millis() - lowIn > pause){
//makes sure this block of code is only executed again after
//a new motion sequence has been detected
lockLow = true;
Serial.print("motion ended at "); //output
Serial.print((millis() - pause)/1000);
Serial.println(" sec");
delay(50);
}
}
}
//the time when the sensor outputs a low impulse
long unsigned int lowIn;
//the amount of milliseconds the sensor has to be low
//before we assume all motion has stopped
long unsigned int pause = 5000;
boolean lockLow = true;
boolean takeLowTime;
int pirPin = 3; //the digital pin connected to the PIR sensor's output
int pirPin2 = 4; //the digital pin connected to the PIR sensor's output
int ledPin = 13;
/////////////////////////////
//SETUP
void setup(){
Serial.begin(9600);
pinMode(pirPin, INPUT);
pinMode(pirPin2, INPUT);
pinMode(ledPin, OUTPUT);
digitalWrite(pirPin, LOW);
//give the sensor some time to calibrate
Serial.print("calibrating sensor ");
for(int i = 0; i < calibrationTime; i++){
Serial.print(".");
delay(1000);
}
Serial.println(" done");
Serial.println("SENSOR ACTIVE");
delay(50);
}
////////////////////////////
//LOOP
void loop(){
if((digitalRead(pirPin) ||digitalRead(pirPin2)) == HIGH){
digitalWrite(ledPin, HIGH); //the led visualizes the sensors output pin state
if(lockLow){
//makes sure we wait for a transition to LOW before any further output is made:
lockLow = false;
Serial.println("---");
Serial.print("motion detected at ");
Serial.print(millis()/1000);
Serial.println(" sec");
delay(50);
}
takeLowTime = true;
}
if((digitalRead(pirPin) ||digitalRead(pirPin2)) == LOW){
digitalWrite(ledPin, LOW); //the led visualizes the sensors output pin state
if(takeLowTime){
lowIn = millis(); //save the time of the transition from high to LOW
takeLowTime = false; //make sure this is only done at the start of a LOW phase
}
//if the sensor is low for more than the given pause,
//we assume that no more motion is going to happen
if(!lockLow && millis() - lowIn > pause){
//makes sure this block of code is only executed again after
//a new motion sequence has been detected
lockLow = true;
Serial.print("motion ended at "); //output
Serial.print((millis() - pause)/1000);
Serial.println(" sec");
delay(50);
}
}
}
Sunday, March 20, 2016
arduino RF-Receiver Code
/*
Example for receiving
http://code.google.com/p/rc-switch/
If you want to visualize a telegram copy the raw data and
paste it into http://test.sui.li/oszi/
*/
#include
RCSwitch mySwitch = RCSwitch();
int a=0;
int relay = 5;
void setup() {
Serial.begin(9600);
mySwitch.enableReceive(0); // Receiver on inerrupt 0 => that is pin #2
}
void loop() {
if (mySwitch.available()) {
a = mySwitch.getReceivedValue();
if(a == 17715){
//Serial.println("Relay ON");
digitalWrite(ledPin, HIGH);
}
if(a == 17724){
//Serial.println("Relay OFF");
digitalWrite(ledPin, LOW);
}
mySwitch.resetAvailable();
}
}
Tuesday, September 22, 2015
ESP8266 Remote Controlled Sockets | ESP8266 control 433mhz remote control
i get this tutorial on website http://randomnerdtutorials.com/esp8266-remote-controlled-sockets/ , i copy from this site for my own purpose documentation, please refer to that website for detail
Parts List
Here’s the hardware that you need to complete this project:
RC Switch Library Download
Here’s the Arduino library you need for this project:
- Download the RC Switch library
- Unzip the RC Switch library
- Remove the “-” from the folder name, otherwise your Arduino IDE won’t recognize your library
- Install the RC Switch library in your Arduino IDE
- Restart your Arduino IDE
The RC Switch library is great and it works with almost all remote controlled sockets in the market.
Receiver Circuit
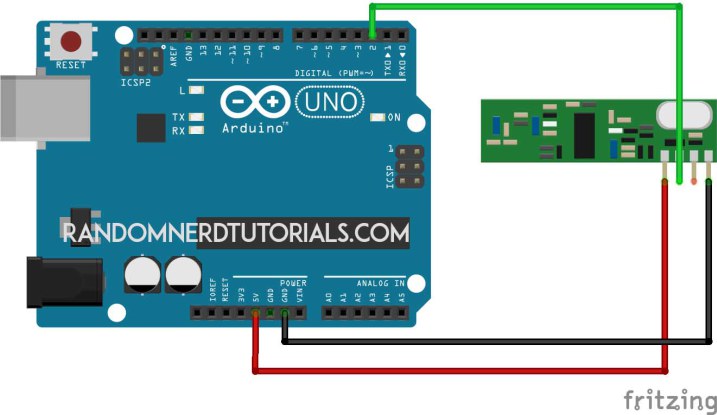
Follow the circuit above for your receiver. Then upload the code below or you can go to File > Examples > RC Switch > ReceiveDemo_Advanced.
/*********
Rui Santos
Complete project details at http://randomnerdtutorials.com
*********/
#include <RCSwitch.h>
RCSwitch mySwitch = RCSwitch();
void setup() {
Serial.begin(9600);
mySwitch.enableReceive(0); // Receiver on inerrupt 0 => that is pin #2
}
void loop() {
if (mySwitch.available()) {
output(mySwitch.getReceivedValue(), mySwitch.getReceivedBitlength(), mySwitch.getReceivedDelay(), mySwitch.getReceivedRawdata(),mySwitch.getReceivedProtocol());
mySwitch.resetAvailable();
}
}
Save the TriState Values
Open your Arduino serial monitor at a baud rate of 9600 and start pressing the buttons of your remote. Save the TriState values (highlighted in red) of each key in a notepad.

Schematics (3.3V FTDI Programmer)
The schematics to upload code to your ESP8266 are very straight forward. You only need to establish a serial communication between your FTDI programmer and your ESP8266 to upload some code.

Uploading your ESP8266 code
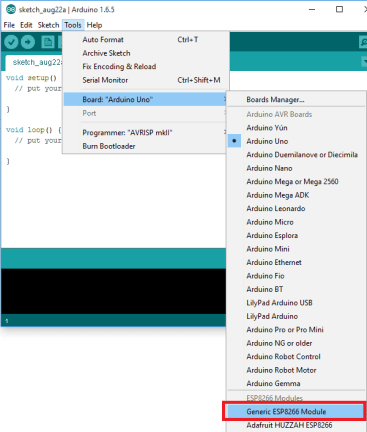
Having the ESP8266 add-on for the Arduino IDE installed (How to Install the ESP8266 Board in Arduino IDE). Go to Tools and select “Generic ESP8266 Module”.
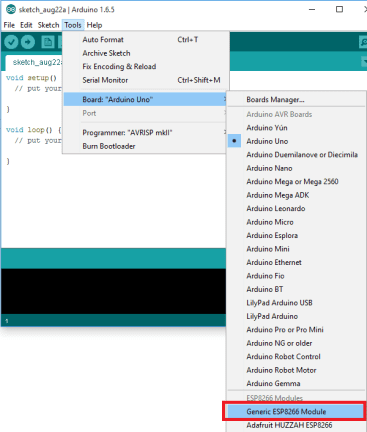
Copy the sketch below to your Arduino IDE. Replace the SSID and password with your own credentials. You also need to change the TriState values. After modifying my sketch upload it to your ESP8266.
/*********
Rui Santos
Complete project details at http://randomnerdtutorials.com
*********/
#include <ESP8266WiFi.h>
#include <WiFiClient.h>
#include <ESP8266WebServer.h>
#include <ESP8266mDNS.h>
#include <RCSwitch.h>
RCSwitch mySwitch = RCSwitch();
MDNSResponder mdns;
// Replace with your network credentials
const char* ssid = "YOUR_SSID";
const char* password = "YOUR_PASSWORD";
ESP8266WebServer server(80);
// Replace with your remote TriState values
char* socket1TriStateOn = "0FFF0FFFFFFF";
char* socket1TriStateOff = "0FFF0FFFFFF0";
char* socket2TriStateOn = "0FFFFF0FFFFF";
char* socket2TriStateOff = "0FFFFF0FFFF0";
String webPage = "";
void setup(void){
webPage += "<h1>ESP8266 Web Server</h1><p>Socket #1 <a href=\"socket1On\"><button>ON</button></a> <a href=\"socket1Off\"><button>OFF</button></a></p>";
webPage += "<p>Socket #2 <a href=\"socket2On\"><button>ON</button></a> <a href=\"socket2Off\"><button>OFF</button></a></p>";
mySwitch.enableTransmit(2);
delay(1000);
Serial.begin(115200);
WiFi.begin(ssid, password);
Serial.println("");
// Wait for connection
while (WiFi.status() != WL_CONNECTED) {
delay(500);
Serial.print(".");
}
Serial.println("");
Serial.print("Connected to ");
Serial.println(ssid);
Serial.print("IP address: ");
Serial.println(WiFi.localIP());
if (mdns.begin("esp8266", WiFi.localIP())) {
Serial.println("MDNS responder started");
}
server.on("/", [](){
server.send(200, "text/html", webPage);
});
server.on("/socket1On", [](){
server.send(200, "text/html", webPage);
mySwitch.sendTriState(socket1TriStateOn);
delay(1000);
});
server.on("/socket1Off", [](){
server.send(200, "text/html", webPage);
mySwitch.sendTriState(socket1TriStateOff);
delay(1000);
});
server.on("/socket2On", [](){
server.send(200, "text/html", webPage);
mySwitch.sendTriState(socket2TriStateOn);
delay(1000);
});
server.on("/socket2Off", [](){
server.send(200, "text/html", webPage);
mySwitch.sendTriState(socket2TriStateOff);
delay(1000);
});
server.begin();
Serial.println("HTTP server started");
}
void loop(void){
server.handleClient();
}
ESP8266 IP Address
Open the Arduino serial monitor at a baud rate of 115200. Connect GPIO 0 of your ESP8266 to VCC and reset your board.
After a few seconds your IP address should appear. In my case it’s 192.168.1.70.

Final Circuit
This is the final circuit for your ESP8266 that hosts a web server and transmits RF signals to control your sockets.

Demonstration
For the final demonstration open any browser from a device that is connected to the same router that your ESP is. Then type the IP address and click Enter!




Now when you press the buttons in your web server you can control both sockets (watch the video at the beginning of this project for a live demo).

Wednesday, September 2, 2015
RTC with dosing pump
// Deven Rich 12-5-2013
// This project was built on the Arduino Uno - ATmega328P
// I would also like to give credit to Maurice Ribble for providing chunks of the RTC code
// This code sets up the DS1307 Real Time clock on the Arduino board to controll 3 dosing pumps
// The RTC keeps track of time, the code checks it and turns on the pumps at a specified time
// to dose your aquarium
#include "Wire.h"
#define DS1307_I2C_ADDRESS 0x68
// Convert normal decimal numbers to binary coded decimal
byte decToBcd(byte val)
{
return ( (val/10*16) + (val%10) );
}
// Convert binary coded decimal to normal decimal numbers
byte bcdToDec(byte val)
{
return ( (val/16*10) + (val%16) );
}
// Stops the DS1307, but it has the side effect of setting seconds to 0
// Probably only want to use this for testing
/*void stopDs1307()
{
Wire.beginTransmission(DS1307_I2C_ADDRESS);
Wire.write(0);
Wire.writeWire.writeWire.write(0x80);
Wire.endTransmission();
}*/
// 1) Sets the date and time on the ds1307
// 2) Starts the clock
// 3) Sets hour mode to 24 hour clock
// Assumes you're passing in valid numbers
void setDateDs1307(byte second, // 0-59
byte minute, // 0-59
byte hour, // 1-23
byte dayOfWeek, // 1-7
byte dayOfMonth, // 1-28/29/30/31
byte month, // 1-12
byte year) // 0-99
{
Wire.beginTransmission(DS1307_I2C_ADDRESS);
Wire.write(0);
Wire.write(decToBcd(second)); // 0 to bit 7 starts the clock
Wire.write(decToBcd(minute));
Wire.write(decToBcd(hour)); // If you want 12 hour am/pm you need to set
// bit 6 (also need to change readDateDs1307)
Wire.write(decToBcd(dayOfWeek));
Wire.write(decToBcd(dayOfMonth));
Wire.write(decToBcd(month));
Wire.write(decToBcd(year));
Wire.endTransmission();
}
// Gets the date and time from the ds1307
void getDateDs1307(byte *second,
byte *minute,
byte *hour,
byte *dayOfWeek,
byte *dayOfMonth,
byte *month,
byte *year)
{
// Reset the register pointer
Wire.beginTransmission(DS1307_I2C_ADDRESS);
Wire.write(0);
Wire.endTransmission();
Wire.requestFrom(DS1307_I2C_ADDRESS, 7);
// A few of these need masks because certain bits are control bits
*second = bcdToDec(Wire.read() & 0x7f);
*minute = bcdToDec(Wire.read());
*hour = bcdToDec(Wire.read() & 0x3f); // Need to change this if 12 hour am/pm
*dayOfWeek = bcdToDec(Wire.read());
*dayOfMonth = bcdToDec(Wire.read());
*month = bcdToDec(Wire.read());
*year = bcdToDec(Wire.read());
}
//define pins
int motorPin1 = 9;
int motorPin2 = 10;
int motorPin3 = 11;
void setup() // run once, when the sketch starts
{
byte second, minute, hour, dayOfWeek, dayOfMonth, month, year;
pinMode(motorPin1, OUTPUT);
pinMode(motorPin2, OUTPUT);
pinMode(motorPin3, OUTPUT);
Wire.begin();
Serial.begin(9600);
// Change these values to what you want to set your clock to.
// You only need to run this the first time you setup your RTC.
// Set the correct value below and un comment it to run it.
/*
second = 45;
minute = 55;
hour = 9;
dayOfWeek = 2;
dayOfMonth = 30;
month = 4;
year = 13;
setDateDs1307(second, minute, hour, dayOfWeek, dayOfMonth, month, year);
*/
}
void loop() // run over and over again
{
byte second, minute, hour, dayOfWeek, dayOfMonth, month, year;
// this prints the output to the serial window (tools > serial monitor in arduino) and is great for testing
getDateDs1307(&second, &minute, &hour, &dayOfWeek, &dayOfMonth, &month, &year);
Serial.print(hour, DEC);
Serial.print(":");
Serial.print(minute, DEC);
Serial.print(":");
Serial.print(second, DEC);
// Set the time you want the motors to kick in
if((hour == 21)&&(minute == 23)&&(second==10)){
Serial.print(" TRUE");
Serial.println(" ");
Serial.println(" MP1");
analogWrite(motorPin1, 255);
delay(8500); // set how long you want the motor to run... 1000 = aprox 1ml
analogWrite(motorPin1, 0);
Serial.println(" MP2");
analogWrite(motorPin2, 255);
delay(9500); // set how long you want the motor to run... 1000 = aprox 1ml
analogWrite(motorPin2, 0);
Serial.println(" MP3");
analogWrite(motorPin3, 255);
delay(5500); // set how long you want the motor to run... 1000 = aprox 1ml
analogWrite(motorPin3, 0);
}
// we dont really need this since we set the pin to low above but just incase <img src="http://fishtankprojects.com/wp-includes/images/smilies/simple-smile.png" alt=":)" class="wp-smiley" style="height: 1em; max-height: 1em;">
else{Serial.println(" false");
analogWrite(motorPin1, 0);
analogWrite(motorPin2, 0);
analogWrite(motorPin3, 0);
}
delay(1000);
}
// This project was built on the Arduino Uno - ATmega328P
// I would also like to give credit to Maurice Ribble for providing chunks of the RTC code
// This code sets up the DS1307 Real Time clock on the Arduino board to controll 3 dosing pumps
// The RTC keeps track of time, the code checks it and turns on the pumps at a specified time
// to dose your aquarium
#include "Wire.h"
#define DS1307_I2C_ADDRESS 0x68
// Convert normal decimal numbers to binary coded decimal
byte decToBcd(byte val)
{
return ( (val/10*16) + (val%10) );
}
// Convert binary coded decimal to normal decimal numbers
byte bcdToDec(byte val)
{
return ( (val/16*10) + (val%16) );
}
// Stops the DS1307, but it has the side effect of setting seconds to 0
// Probably only want to use this for testing
/*void stopDs1307()
{
Wire.beginTransmission(DS1307_I2C_ADDRESS);
Wire.write(0);
Wire.writeWire.writeWire.write(0x80);
Wire.endTransmission();
}*/
// 1) Sets the date and time on the ds1307
// 2) Starts the clock
// 3) Sets hour mode to 24 hour clock
// Assumes you're passing in valid numbers
void setDateDs1307(byte second, // 0-59
byte minute, // 0-59
byte hour, // 1-23
byte dayOfWeek, // 1-7
byte dayOfMonth, // 1-28/29/30/31
byte month, // 1-12
byte year) // 0-99
{
Wire.beginTransmission(DS1307_I2C_ADDRESS);
Wire.write(0);
Wire.write(decToBcd(second)); // 0 to bit 7 starts the clock
Wire.write(decToBcd(minute));
Wire.write(decToBcd(hour)); // If you want 12 hour am/pm you need to set
// bit 6 (also need to change readDateDs1307)
Wire.write(decToBcd(dayOfWeek));
Wire.write(decToBcd(dayOfMonth));
Wire.write(decToBcd(month));
Wire.write(decToBcd(year));
Wire.endTransmission();
}
// Gets the date and time from the ds1307
void getDateDs1307(byte *second,
byte *minute,
byte *hour,
byte *dayOfWeek,
byte *dayOfMonth,
byte *month,
byte *year)
{
// Reset the register pointer
Wire.beginTransmission(DS1307_I2C_ADDRESS);
Wire.write(0);
Wire.endTransmission();
Wire.requestFrom(DS1307_I2C_ADDRESS, 7);
// A few of these need masks because certain bits are control bits
*second = bcdToDec(Wire.read() & 0x7f);
*minute = bcdToDec(Wire.read());
*hour = bcdToDec(Wire.read() & 0x3f); // Need to change this if 12 hour am/pm
*dayOfWeek = bcdToDec(Wire.read());
*dayOfMonth = bcdToDec(Wire.read());
*month = bcdToDec(Wire.read());
*year = bcdToDec(Wire.read());
}
//define pins
int motorPin1 = 9;
int motorPin2 = 10;
int motorPin3 = 11;
void setup() // run once, when the sketch starts
{
byte second, minute, hour, dayOfWeek, dayOfMonth, month, year;
pinMode(motorPin1, OUTPUT);
pinMode(motorPin2, OUTPUT);
pinMode(motorPin3, OUTPUT);
Wire.begin();
Serial.begin(9600);
// Change these values to what you want to set your clock to.
// You only need to run this the first time you setup your RTC.
// Set the correct value below and un comment it to run it.
/*
second = 45;
minute = 55;
hour = 9;
dayOfWeek = 2;
dayOfMonth = 30;
month = 4;
year = 13;
setDateDs1307(second, minute, hour, dayOfWeek, dayOfMonth, month, year);
*/
}
void loop() // run over and over again
{
byte second, minute, hour, dayOfWeek, dayOfMonth, month, year;
// this prints the output to the serial window (tools > serial monitor in arduino) and is great for testing
getDateDs1307(&second, &minute, &hour, &dayOfWeek, &dayOfMonth, &month, &year);
Serial.print(hour, DEC);
Serial.print(":");
Serial.print(minute, DEC);
Serial.print(":");
Serial.print(second, DEC);
// Set the time you want the motors to kick in
if((hour == 21)&&(minute == 23)&&(second==10)){
Serial.print(" TRUE");
Serial.println(" ");
Serial.println(" MP1");
analogWrite(motorPin1, 255);
delay(8500); // set how long you want the motor to run... 1000 = aprox 1ml
analogWrite(motorPin1, 0);
Serial.println(" MP2");
analogWrite(motorPin2, 255);
delay(9500); // set how long you want the motor to run... 1000 = aprox 1ml
analogWrite(motorPin2, 0);
Serial.println(" MP3");
analogWrite(motorPin3, 255);
delay(5500); // set how long you want the motor to run... 1000 = aprox 1ml
analogWrite(motorPin3, 0);
}
// we dont really need this since we set the pin to low above but just incase <img src="http://fishtankprojects.com/wp-includes/images/smilies/simple-smile.png" alt=":)" class="wp-smiley" style="height: 1em; max-height: 1em;">
else{Serial.println(" false");
analogWrite(motorPin1, 0);
analogWrite(motorPin2, 0);
analogWrite(motorPin3, 0);
}
delay(1000);
}
Subscribe to:
Posts (Atom)